
 Try for free
 Blog
How to Manage Custom Orders on Shopify: Draft Orders, Tags, and Packing Slips
A spoon-fed stack for custom Shopify orders: options apps for intake, tags and Shopify Flow, packing slips with line-item properties, draft orders offline, and when Orderline replaces the multi-app morning.
Written by Subhendu Singh · Published · Updated
On this page
- The outcome you are building
- 1. Capture options at checkout (product options apps)
- Apps merchants commonly use
- Worked path: Infinite Product Options
- 2. Offline and phone jobs: Shopify draft orders
- 3. Filter custom work with tags (and optional automation)
- Manual tags (every plan)
- Auto-tag with Shopify Flow (when you outgrow hand-tagging)
- 4. Put personalization on the packing slip (Order Printer Pro)
- Worked path: Order Printer Pro + properties
- 5. The morning loop after the stack is in place
- Exceptions worth writing down
- 6. When the multi-app stack still hurts
- 7. Orderline when you want the ops surface in one place
- Questions newer merchants ask
- What to do this week
If you sell engraved jewelry, embroidered apparel, custom leather goods, or anything else made after the customer pays, “managing custom orders on Shopify” is not only about taking payment. It is about making sure the personalization the customer chose—or the specs you quoted by phone—still exists when someone at the bench is ready to work.
In Why Shopify Orders Fail Made-to-Order Sellers, we covered why the Shopify default order list feels empty for makers. In Shopify Order Management for Made-to-Order Products, we covered what order management should mean and how tool categories differ. This article is the how: a practical stack merchants already hear about on forums—product options apps, draft orders, tags, and packing slips—with real install steps, one worked app path per job, and a clear place for Orderline when you want that stack in one production view instead of three or four tools.
Orderline publishes this guide. We document free and third-party tools honestly first. Orderline is not a storefront options form builder; it is a production workspace that reads personalization after checkout. Options apps remain the right tool for collecting choices on the product page. Contact us with factual corrections.
App names, pricing, and Admin UI change. Re-check each vendor’s App Store listing and your own Shopify Admin before you standardize the team on any path. Listing screenshots below are from public App Store galleries (as of research in July 2026), not private Admin sessions of your store.
The outcome you are building
A working custom-order system on Shopify does five jobs in order:
- Capture personalization at checkout (or on a draft order if the sale is offline).
- Land that detail on the paid order as line item properties or an explicit draft note.
- Filter custom work on the Shopify order list with tags.
- Print what the floor needs—including those properties—on a packing slip or PDF.
- Fulfill in Shopify Admin only when the physical product matches the line.
Miss step 1 and no amount of tags will save you. Skip step 4 and staff re-open every order. Glue all five across separate apps and the morning works—until volume or a second maker makes the glue more expensive than one production surface.
Before any app, write a one-line capture rule and post it where phone orders are taken: when email, proof, and the Shopify order disagree, which record wins, and who may change it after checkout? Production should start only after that record is correct.
1. Capture options at checkout (product options apps)
Shopify variants alone (size, color) are not enough when every order needs free-text engraving, placement, thread color, or a file. That is what line item properties are for: name/value pairs attached to a specific line on the order (Shopify line item documentation). Product options apps add those fields to the product page so the customer fills them in before checkout, and the values ride into Shopify Admin on the line.
Apps merchants commonly use
| App | Role for custom sellers | Notes (re-check listing) |
|---|---|---|
| Infinite Product Options (ShopPad) | Text fields, dropdowns, conditionals, add-ons; selections included on the order in Admin | Built for Shopify; lists Order Printer among integrations; ~$12.99/mo with trial |
| Aco – Product Options & Addons | Drag-and-drop options, uploads, dynamic pricing | Listed among apps Orderline works with on the Orderline App Store page |
| Easify Product Options (and similar) | Form-style options when you need another form builder | Category alternative—verify it writes line properties, not only cart notes |
Pick one options app for the storefront. Do not install three. Success is not “fields on the product page.” Success is: open a test order in Shopify Admin and see Engraving, Font, or Thread color on the line item.
Worked path: Infinite Product Options
Infinite Product Options is a mature options app (thousands of reviews) built for personalization beyond variant limits. Public listing claims include text boxes, dropdowns, checkboxes, conditional logic, add-on pricing, and that customer selections are included with each order in your Shopify Admin.
What to do:
- Install Infinite Product Options from the Shopify App Store and complete theme install (ShopPad documents automatic and theme-specific installs for Online Store 2.0 themes such as Dawn; after a theme switch you often reinstall the app embed).
- In the app, create an option set for a real custom product—for example fields named
Engraving,Font, andGift note. Prefer clear production names over cute marketing labels. - Assign the option set to the products that need it (not every SKU in the catalog).
- Place a test order on yourself with obvious fake text (
TEST-ENGRAVE-123). - In Shopify Admin, open Orders, open that order, and confirm each field appears under the line item. If the product page looks customized but the order does not show properties, fix the options app / theme install before you scale ads.
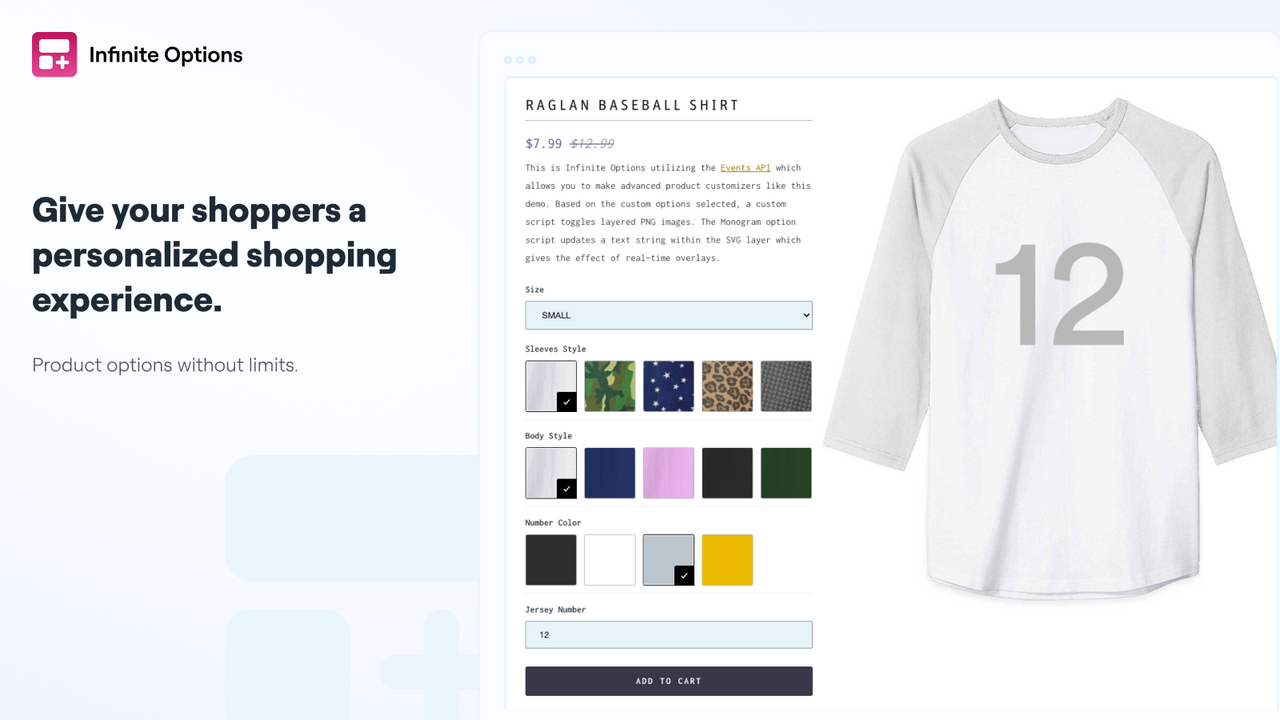
Public App Store screenshot for Infinite Product Options: shoppers personalize on the product page. Confirm the same values appear on the paid order line in your Admin.
Done when: any staff member can open one paid order and read every custom field without Slack or email.
Aco and similar apps follow the same logic—install, build fields, assign products, test that line item properties survive checkout. Orderline does not replace this step; it reads those properties after the order exists.
2. Offline and phone jobs: Shopify draft orders
When the sale starts by email, phone, wholesale, or in person, the customer never used your product form. Shopify’s native path is a draft order (Shopify Help: creating draft orders).
What to do:
- In Shopify Admin go to Orders → Drafts → Create order.
- Add a catalog product when one exists.
- Use Add custom item for one-off fees or products not in the catalog (name, price, quantity). Shopify notes custom items show without a product image or clickable product title and can complicate shipping automation—prefer catalog products when you can.
- Put final measurements and personalization in a note you treat as authoritative, and/or in a clear custom-item name. Add a filter tag such as
custom-quote. - Send invoice, take payment, or mark paid. When paid, the job appears on the main Shopify order list (draft orders overview).
Structured line item property fields on drafts are often weaker than online product forms, so many shops rely on disciplined notes—or draft-helper apps—until payment. Decide the authoritative field before a rush week.
Example shape: leather goods quote by email → draft base product + custom item “Rush pattern fee $25” → note “Left strap +2 cm” → tag custom-quote → invoice → after pay, re-read the note before cutting.
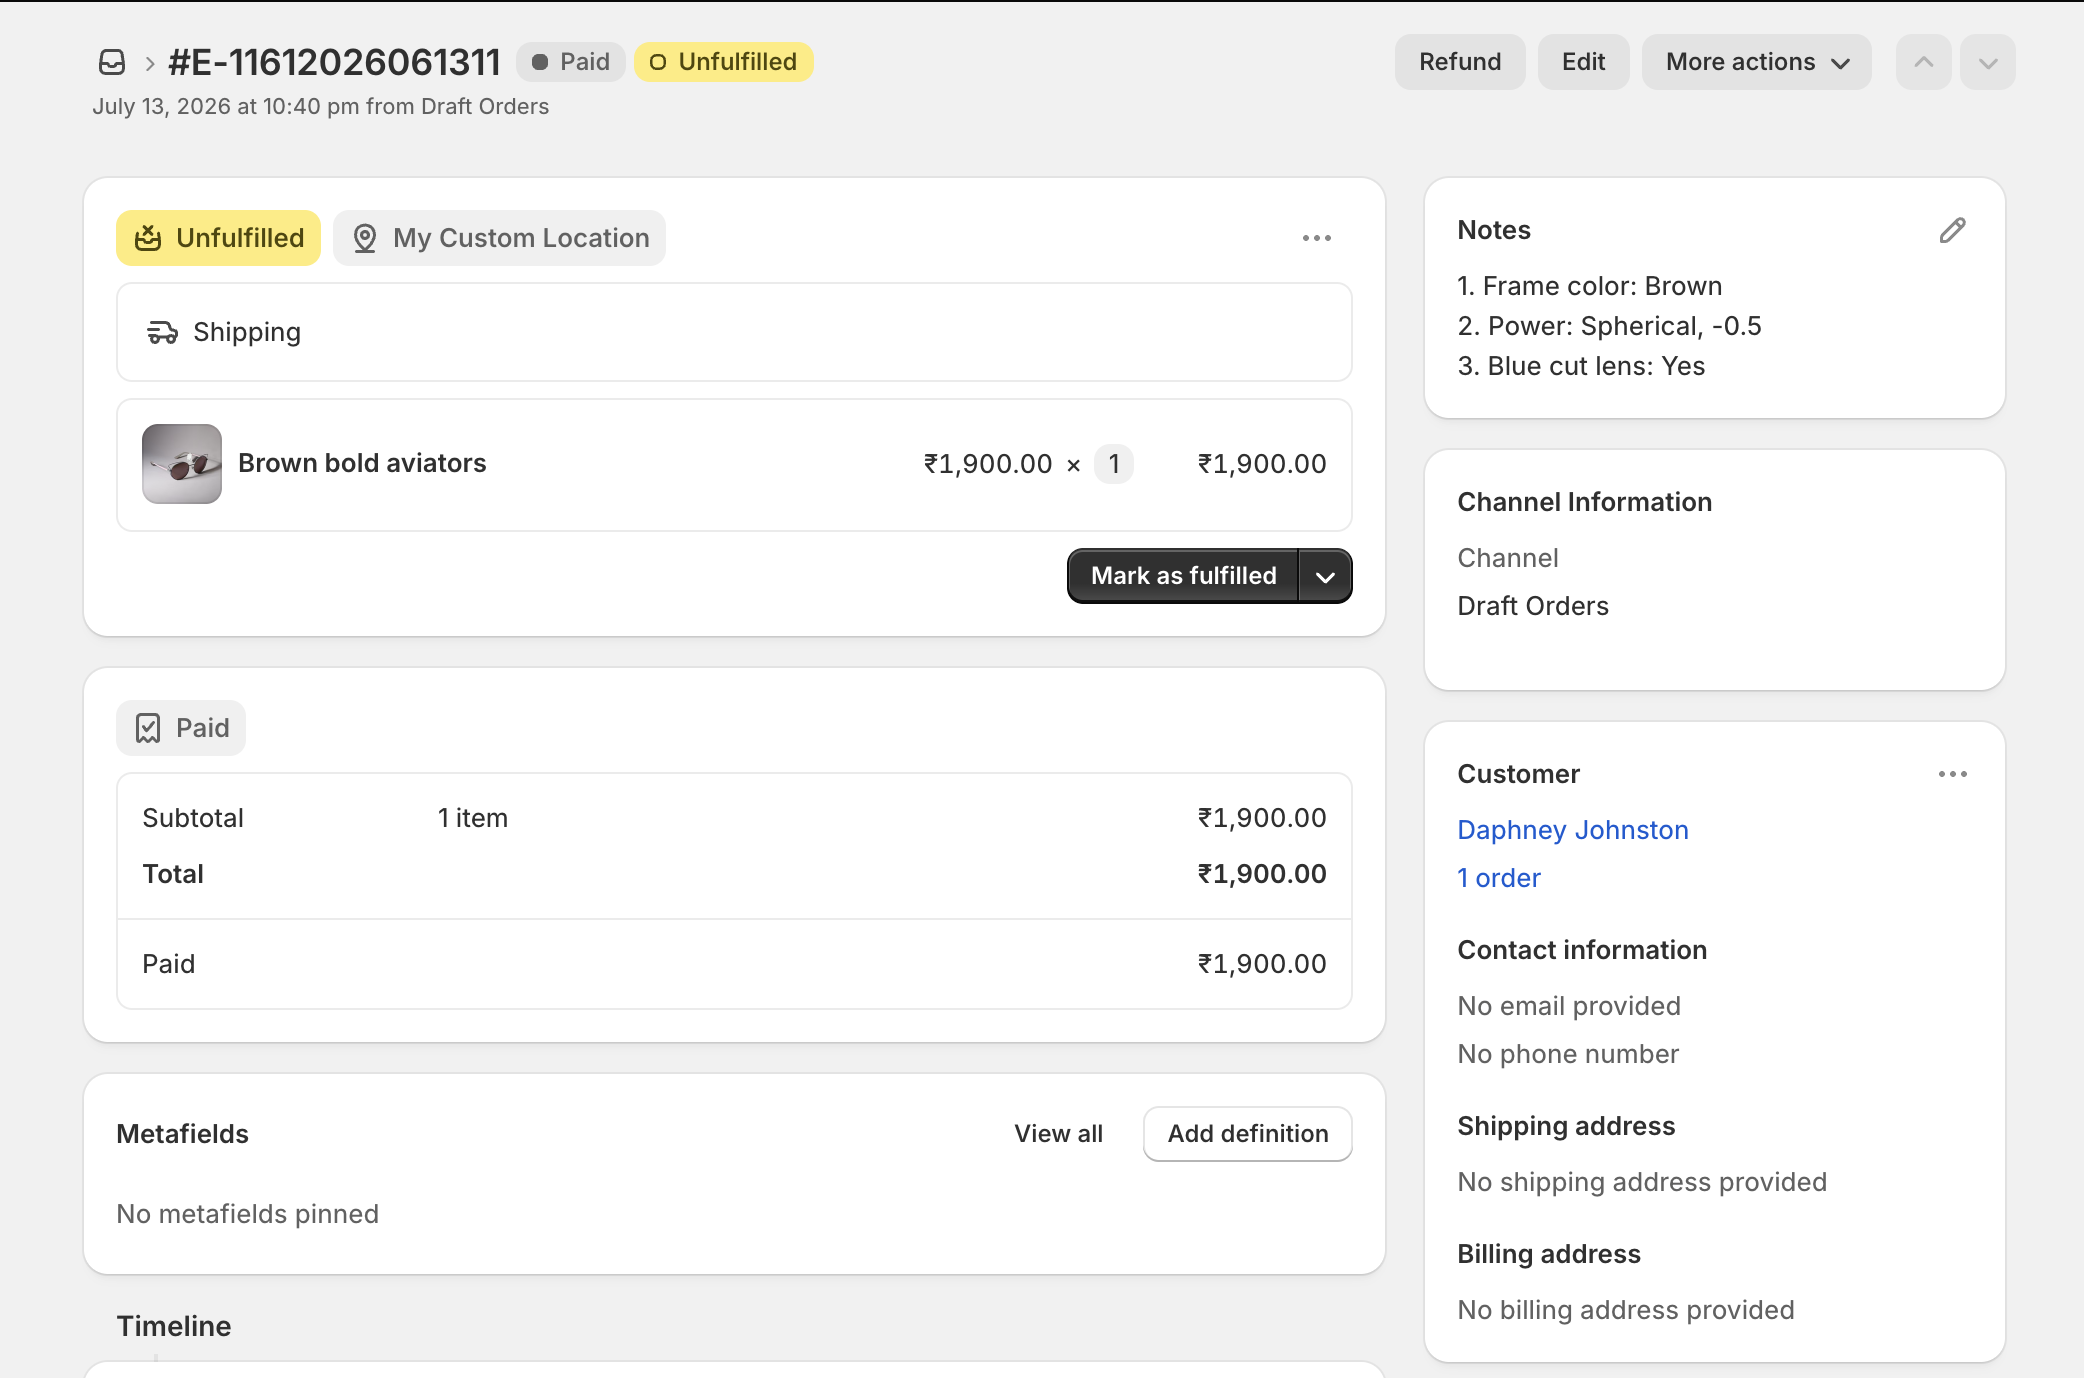
Shopify draft order: when the sale is offline, put the final approved customizations in a note you treat as authoritative before you send the invoice.
Done when: nothing the maker needs still lives only in an email thread.
3. Filter custom work with tags (and optional automation)
Tags do not store engraving text. They slice the Shopify default order list so custom work is not mixed with ready-to-ship stock.
Manual tags (every plan)
- Open an order in Shopify Admin.
- In the tags field, add a small, consistent set—for example
custom,rush,proof-hold,custom-quote. - On the Shopify order list, filter by tag (and by Paid / Unfulfilled) so the morning queue is finite and shared.
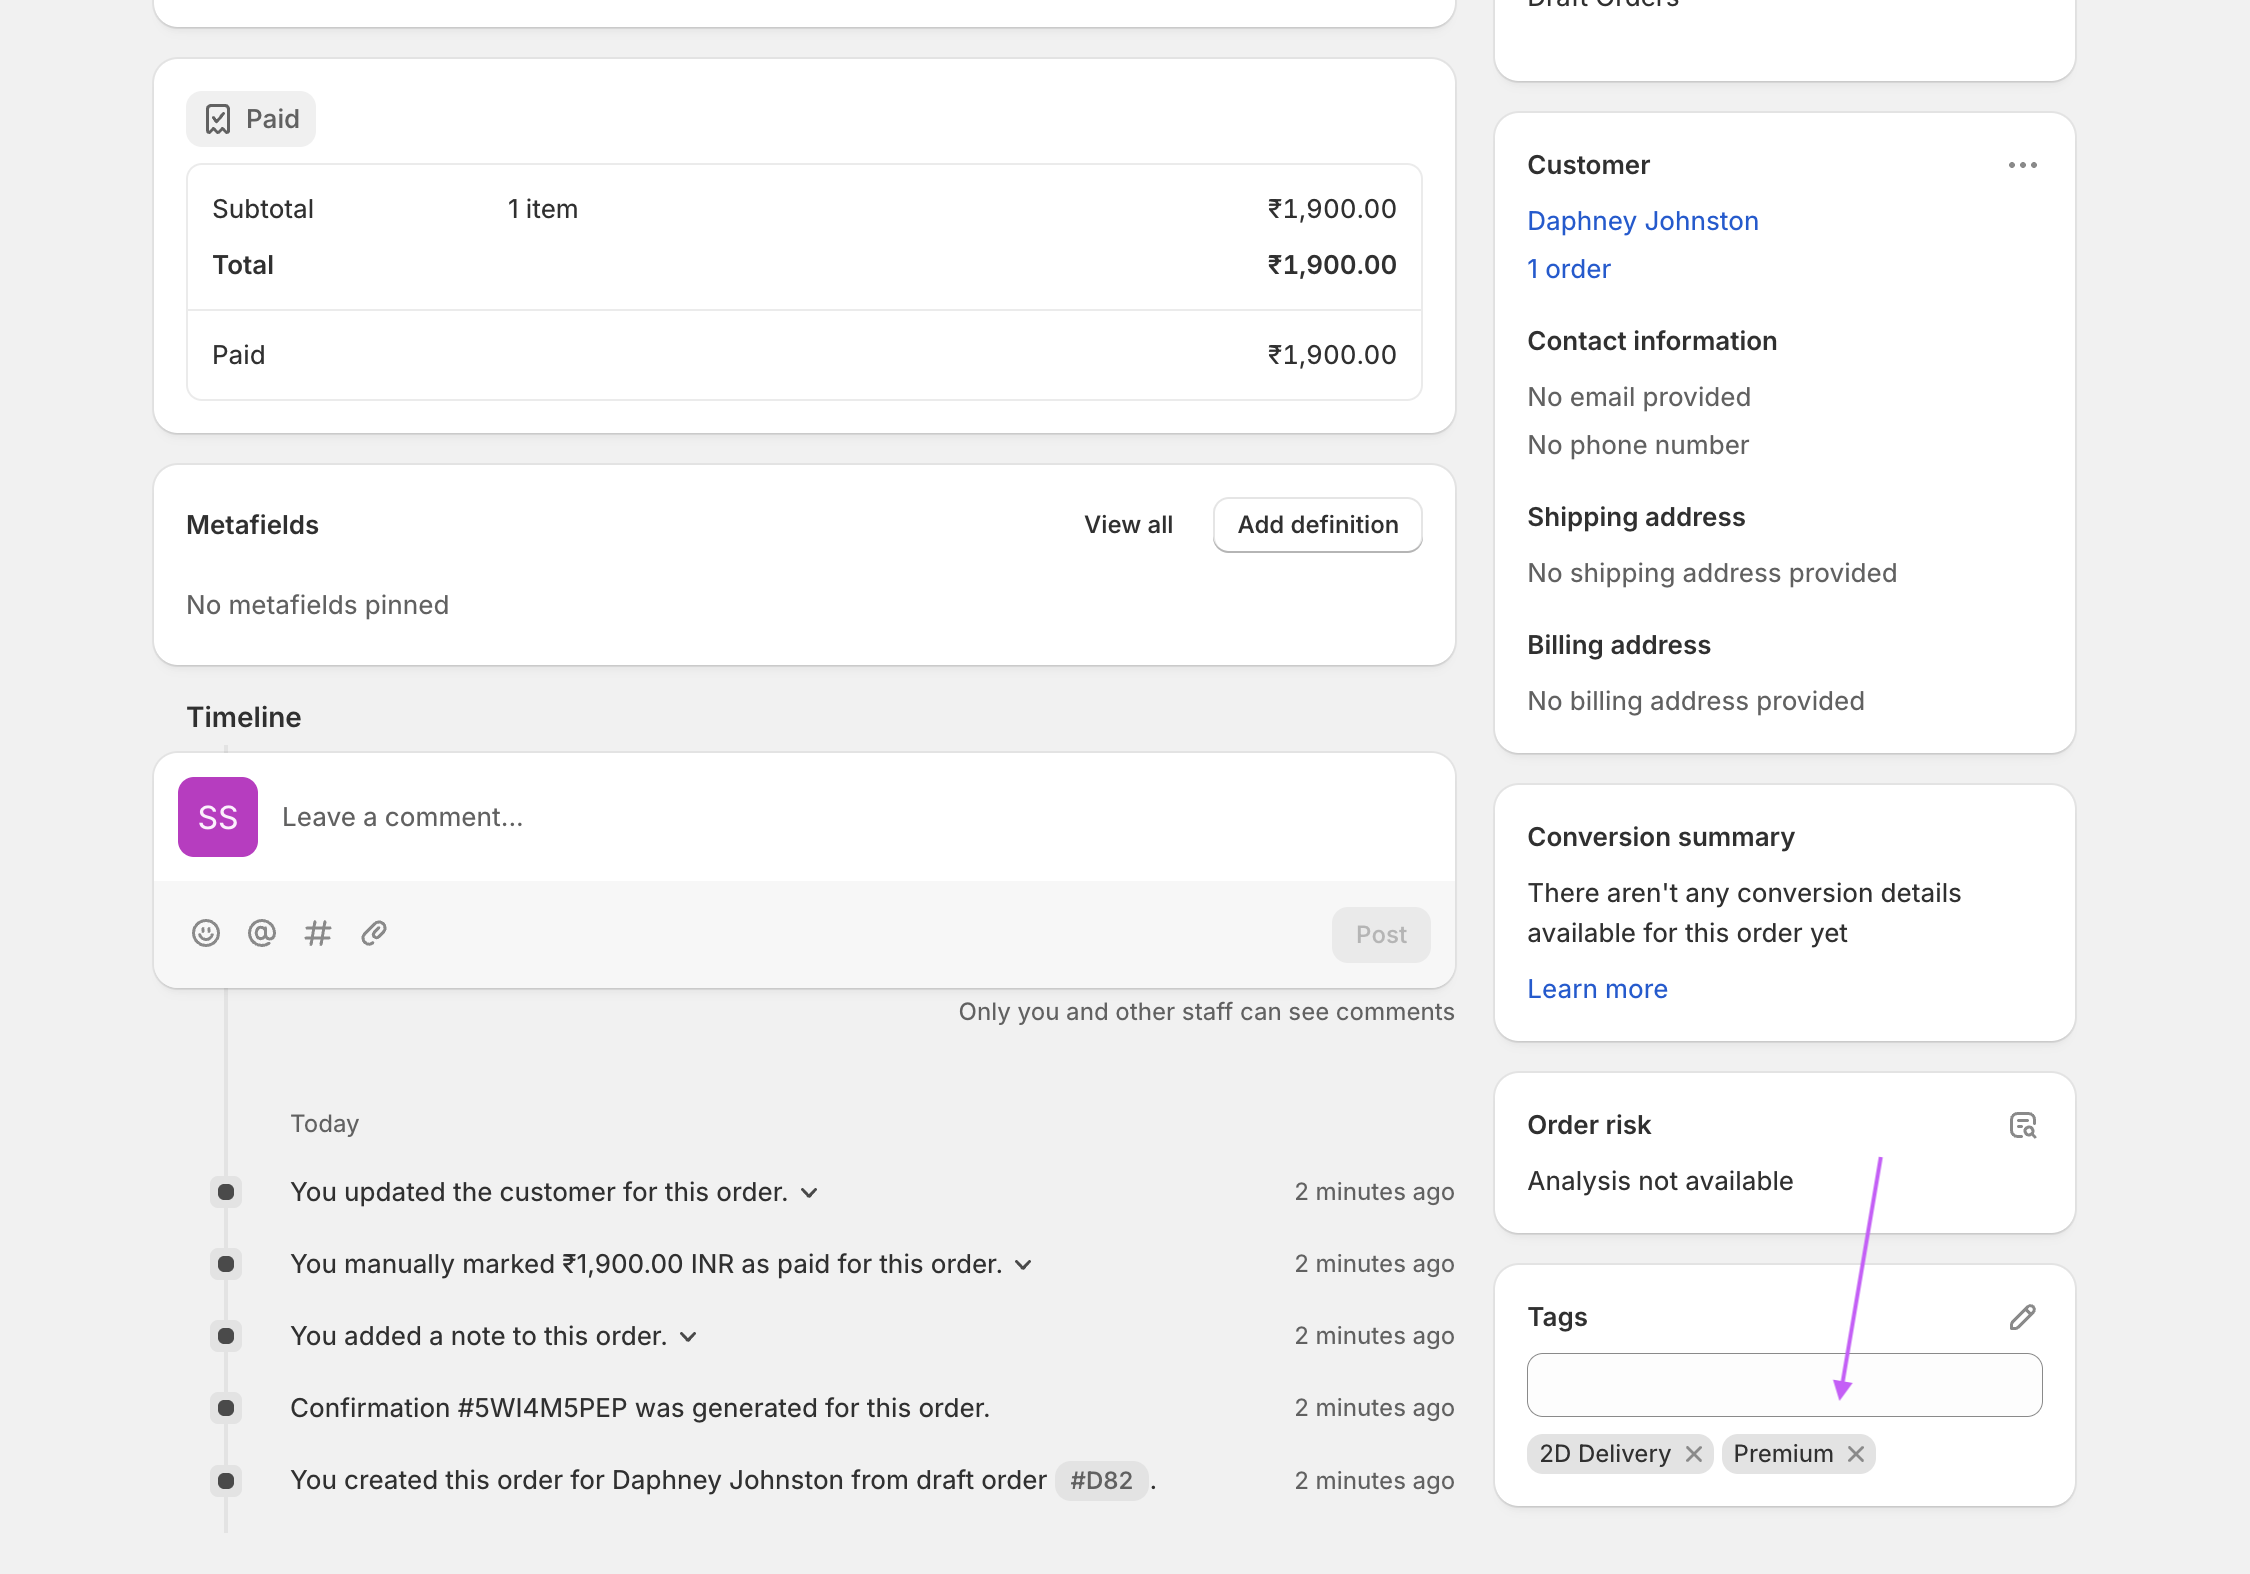
Shopify order detail: tags live on the order for filtering—not as a place to store engraving text.
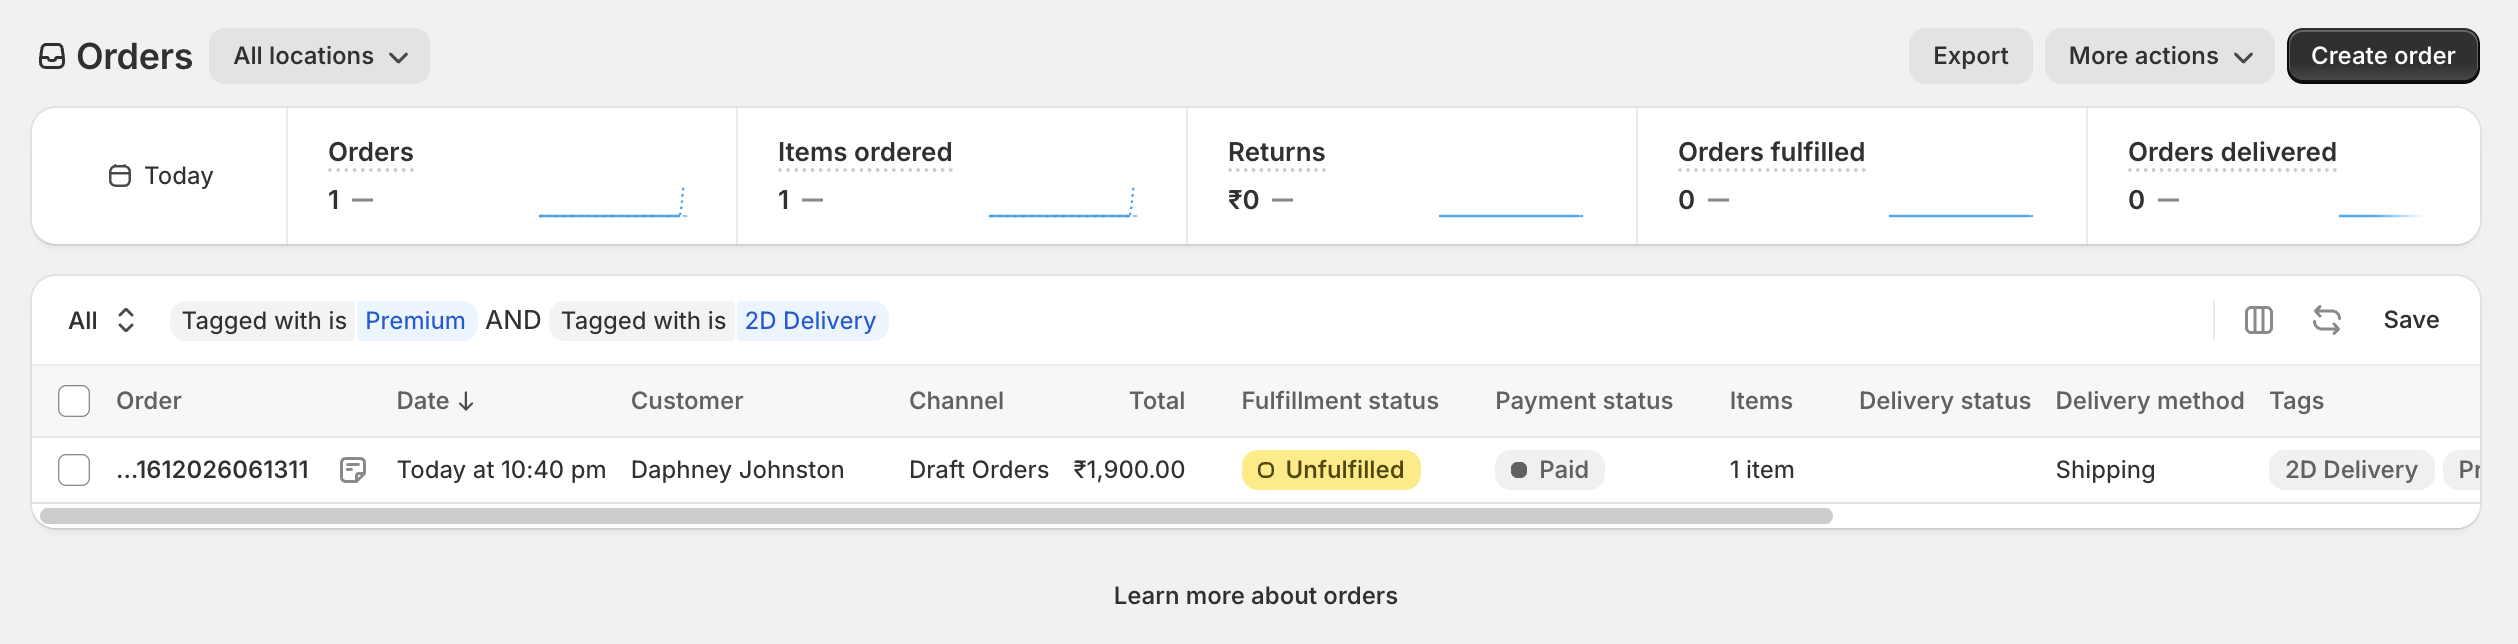
Shopify order list filtered by tag: the morning queue becomes a finite set of custom jobs instead of every paid order in the store.
Use tags for process, not for the promise. proof means “waiting on approval,” not “the font is Script.”
Auto-tag with Shopify Flow (when you outgrow hand-tagging)
Shopify Flow is Shopify’s free automation app (availability depends on plan). A common pattern for custom catalogs is to tag the order when it is created if a line matches a product title, SKU, or product tag you use for made-to-order work:
- Install Shopify Flow if it is not already on your store.
- Create a workflow with trigger Order created.
- Add a condition such as: line item product title or SKU matches your custom product (or the product has tag
made-to-order). - Action: Add order tags →
custom(andrushif you detect a rush product or note). - Save and test with a new order.
You can also ask Shopify Sidekick (the AI assistant in Shopify Admin) to build this workflow for you in plain language—for example, “When an order is created, if any line item title or SKU matches our custom products, add the order tag custom.” Review the generated Flow before you turn it on, then place a test order to confirm the tag lands.
Shopify documents an Add order tags action for Flow; merchants routinely use “order created → condition on product → add order tags” for this job (Flow action reference). Third-party “order tagger” apps exist if Flow is not available on your plan; prefer Flow first so you do not pay another app only for tags.
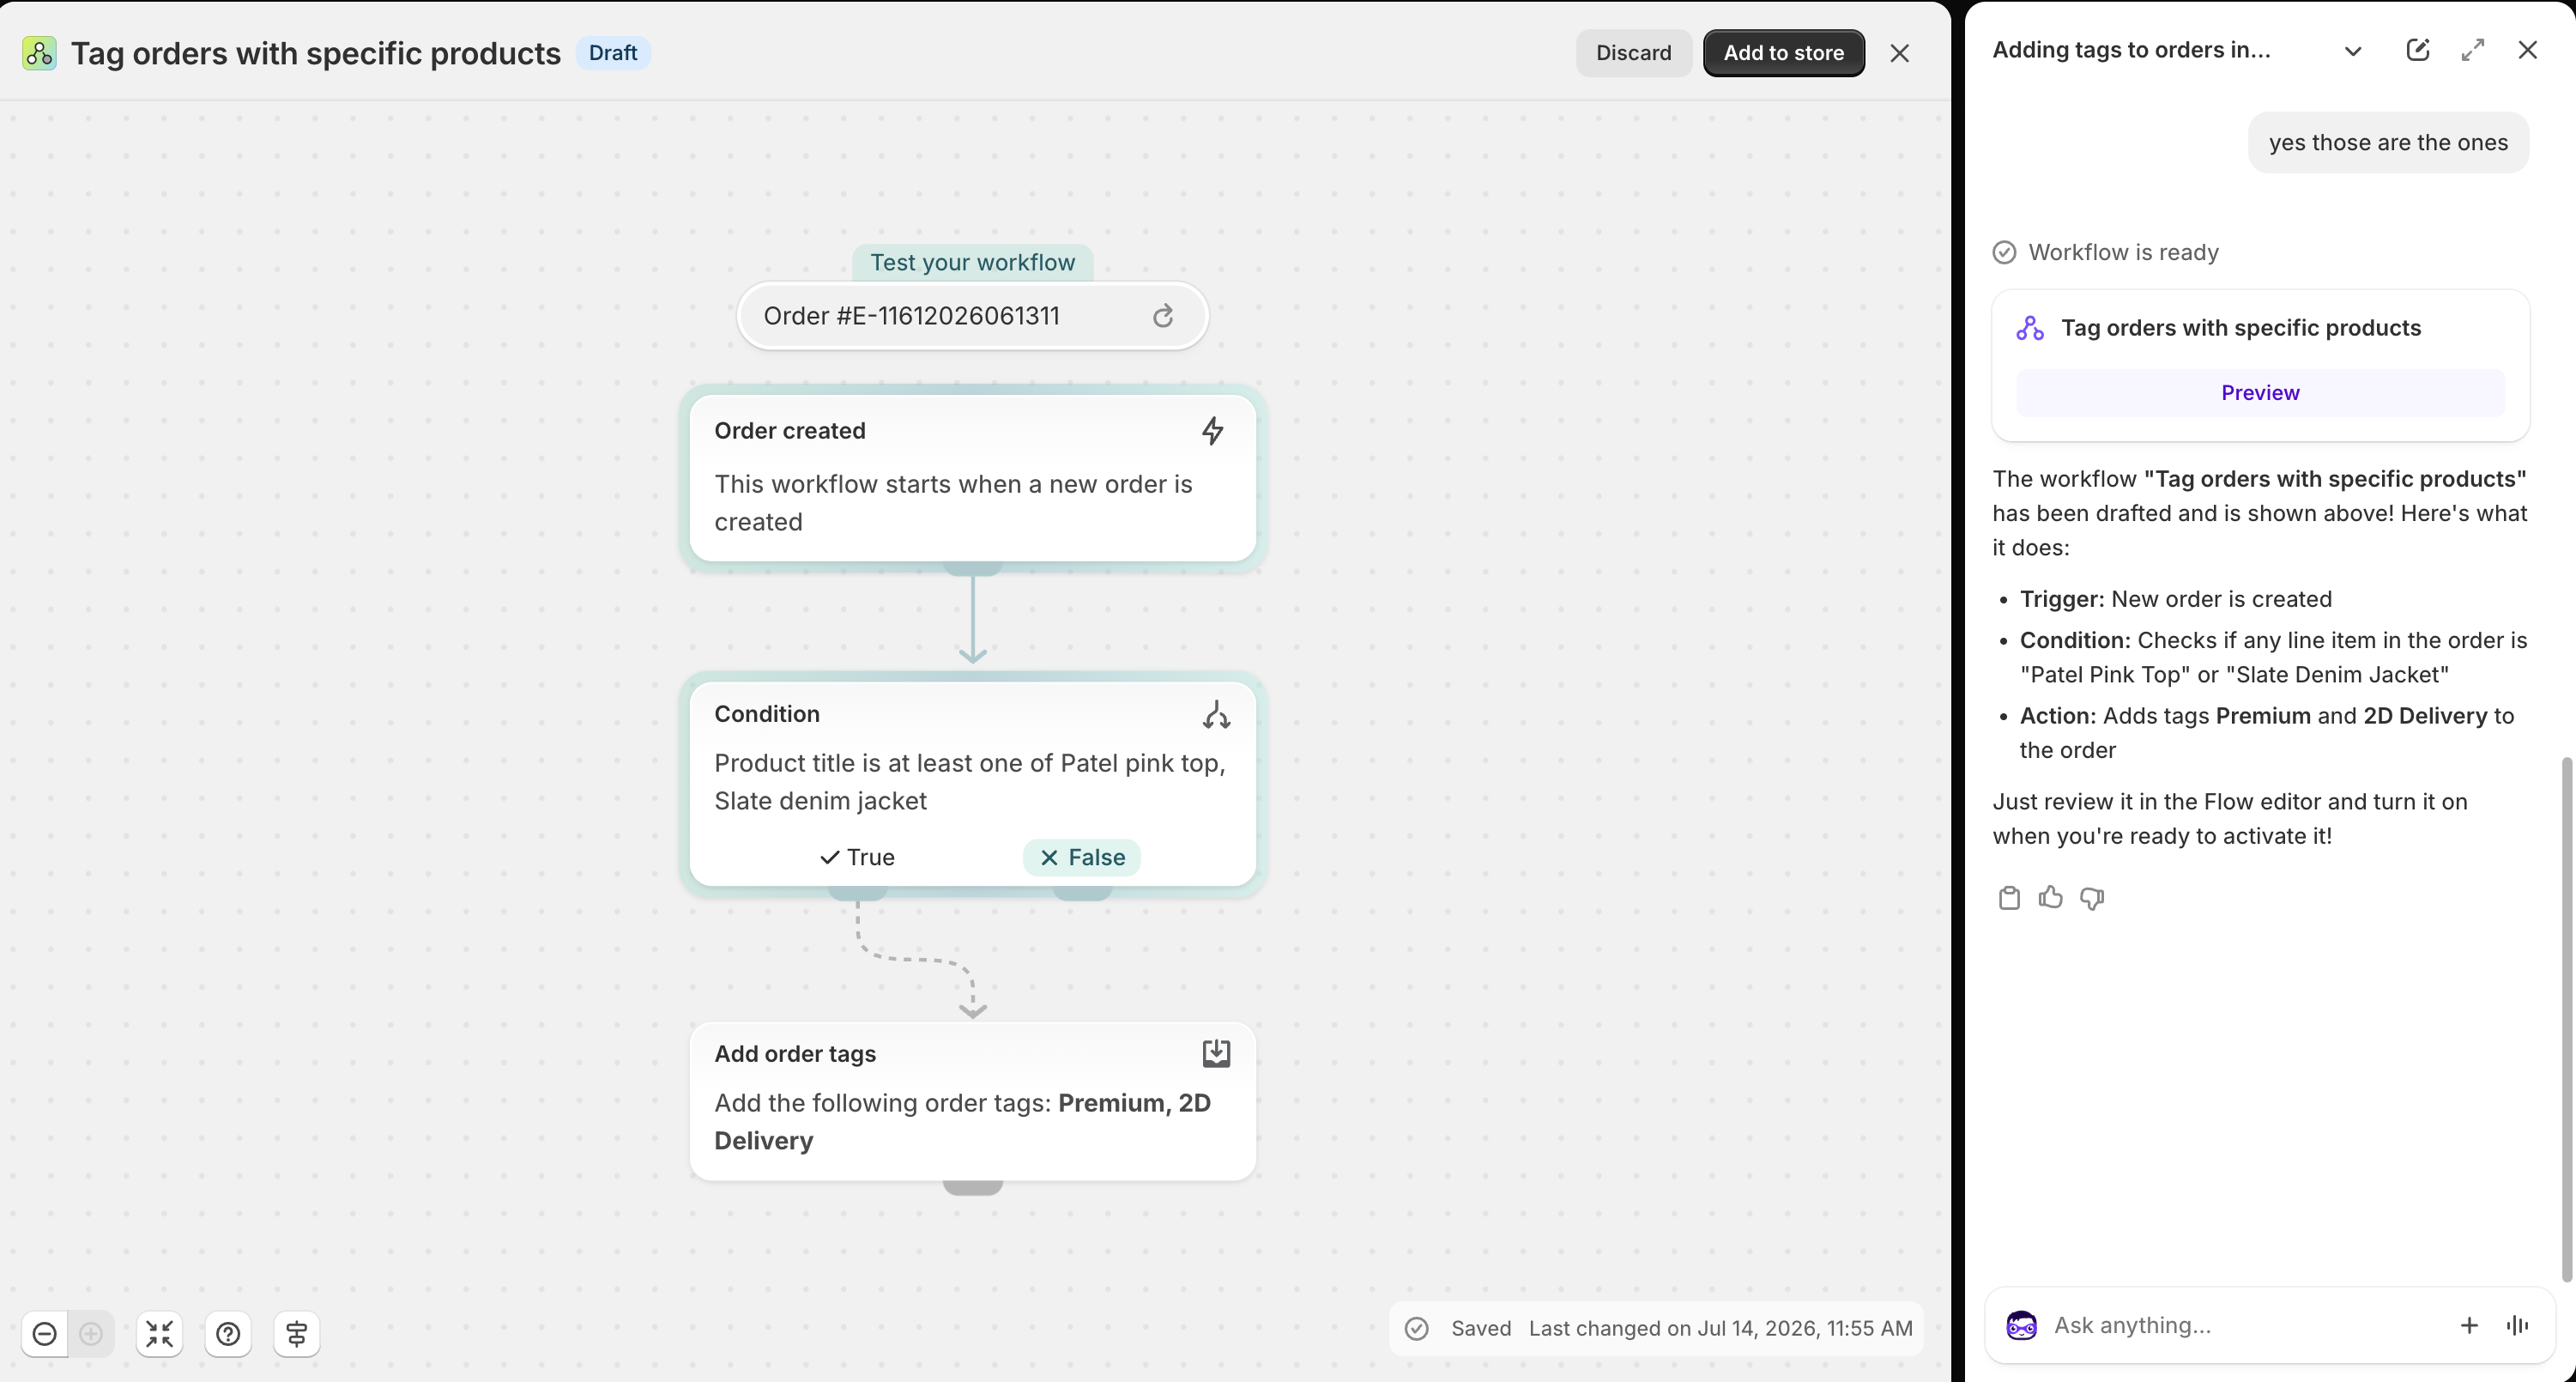
Shopify Flow: order created → check line item product title (or SKU) → add order tags. Sidekick can scaffold this; you still verify the condition and a test order.
Done when: any trained person can open Orders, filter custom + Unfulfilled, and see only jobs that need making—without hunting.
4. Put personalization on the packing slip (Order Printer Pro)
Forum advice to “just print packing slips” only works if the line item properties print. Native Shopify packing slip templates can be customized with Liquid, but many custom sellers use a dedicated printer app for bulk PDF and template control.
Shopify’s older free Order Printer listing is no longer a straightforward App Store install for new merchants. The widely used successor class is Order Printer Pro (and similar PDF invoice apps). Order Printer Pro’s public listing emphasizes PDF invoices, packing slips, bulk print/export, draft orders, and customizable templates. Pricing is free to install with order-volume tiers after a monthly free allowance—re-check the live listing.
Infinite Options’ own documentation states that Order Printer Pro supports line item properties by default, so custom options should appear on invoices and packing slips without code—if they already show on the Shopify order line. For the classic Order Printer app (or a stripped custom template), they document pasting a Liquid loop after line_item.title so each property prints under the product name (Infinite Options × Order Printer docs).
Worked path: Order Printer Pro + properties
- Confirm a test order in Shopify Admin already shows line item properties under the product. If not, fix intake first (section 1).
- Install Order Printer Pro.
- Open the app’s templates (packing slip or invoice you use on the floor).
- Print or PDF a test order that has custom options. Check that Engraving / Font appear under the line.
- If they are missing and you use a heavily customized template, add a properties loop after the product title (same idea as Infinite Options’ docs), save, and print a new test—old PDFs do not retroactively update.
- On busy mornings, bulk-select unfulfilled custom orders and print the packing-slip template so the floor can work from paper/PDF without opening every order in Admin.

Public App Store screenshot for Order Printer Pro: professional order documents. Your packing slip must show line item properties—verify with a personalized test order.
Done when: the PDF the maker holds matches the line item properties on the paid order.
Native Shopify packing slips remain an option if you are comfortable editing the packing slip template Liquid yourself. The principle is the same: properties must render next to the line, not only in Admin order detail. Orderline’s free Shopify packing slip templates designer generates that Liquid visually, including customer-facing line-item properties, for Shopify’s native editor.
5. The morning loop after the stack is in place
With intake, tags, and slips working, the daily habit is boring—and that is the point.
Start from the Shopify default order list. Filter Paid + Unfulfilled (or tag custom). Open each job only if you still need something the slip does not show. Move internal stage with tags or a simple shared board (proof → in-production → ready-to-ship), remembering that Shopify’s Unfulfilled / Fulfilled answers shipping readiness, not bench progress (merchant discussions of manufacturing steps). Mark Fulfilled in Shopify Admin only when the physical work matches the line—partial fulfill stocked lines while made-to-order lines stay open.
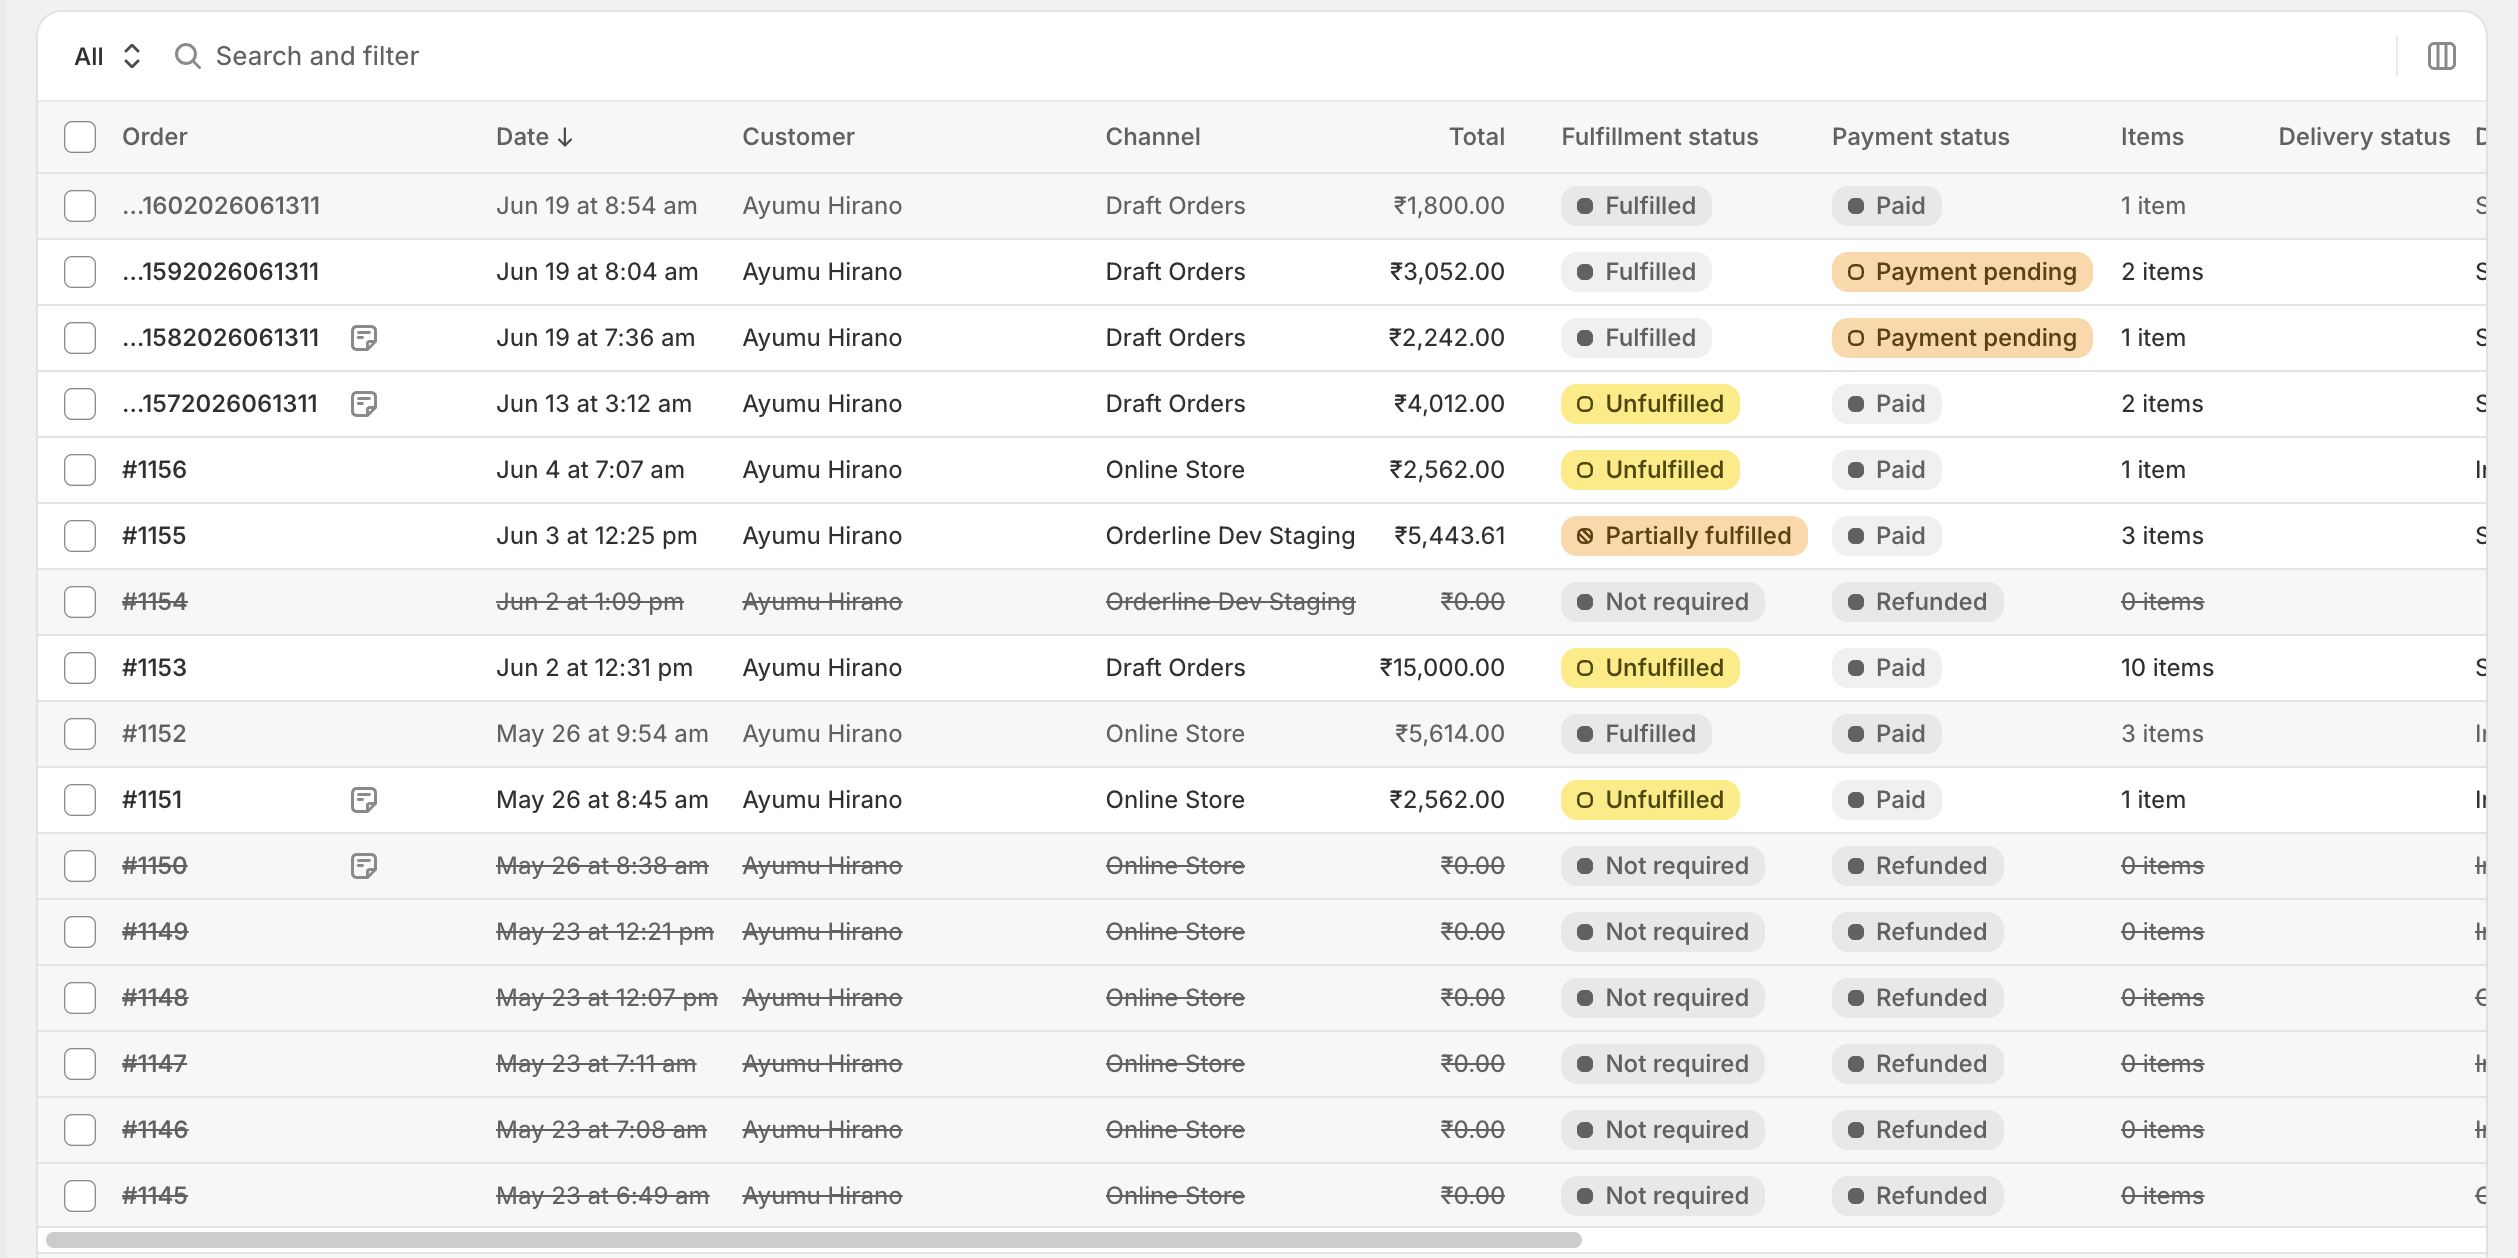
The Shopify default order list is built around payment and fulfillment—not engraving text as a list column. That is why slips, tags, and (later) a production queue exist.
Exceptions worth writing down
Changed engraving after checkout. Confirm in writing, update the authoritative record (property path if your stack allows, else a dated note that names the line), hold production, then release.
Mixed cart. Partial fulfill stocked lines; keep custom lines unfulfilled through make and QC against properties.
Proof required. Tag proof-hold; do not fulfill until approval is on the order.
Offline quote still in email. Paste final text onto the draft before invoice; freeze the paid order as truth.
6. When the multi-app stack still hurts
Time yesterday’s unfulfilled custom orders. If most of these fail at your volume, more tags will not fix it:
- Every personalization string is findable without tribal knowledge.
- Custom work is filterable.
- Pack slips match production.
- Stages are shared across people.
- You are not spending the morning only opening orders to re-read properties already on the line.
At roughly ten to fifteen custom jobs a day with one operator, options app + draft discipline + tags + Order Printer Pro is a rational system. At higher volume, multiple makers, or when you need images + properties + internal statuses + ship-by on one screen, the glue cost of four tools often exceeds one production-queue app. If materials and BOMs drive promise dates, look at MRP—not another list app. Category framing lives in the made-to-order order management guide.
7. Orderline when you want the ops surface in one place
What Orderline is: a Shopify app for made-to-order sellers that shows product images, line items, and customizations in one view, with custom production statuses, ship-by prioritization, draft order workflows, and bulk packing slips—so staff are not forced to treat the Shopify default order list as a bench board. Public listing (July 2026 research): Starter $9 / Pro $19 / Pro+ $39 per month, 7-day trial; works with Aco Product Options, Infinite Product Options, other options apps, metafields, and Shippo (Orderline on the App Store).
What Orderline is not: a product options form on the product page, a customer parcel tracker, or MRP. Keep Infinite Options or Aco (or your chosen options app) for intake. Use Orderline for after checkout.
| Job | DIY stack (this article) | With Orderline |
|---|---|---|
| Collect engraving on the product page | Infinite Options / Aco / similar | Still the options app |
| Offline quote | Shopify draft orders | Drafts in Admin + Orderline draft workflows |
| Filter custom work | Tags + optional Flow | Tags, filters, custom statuses |
| See properties without opening every order | Packing slip PDF (Order Printer Pro) | Properties (and images) on the production queue |
| Production stages | Tags / spreadsheet | Custom statuses on the same queue |
| Pack | Printer app / native slips | Bulk packing slips in-app |

Public App Store screenshot: Orderline order line items and customizations in one view—built for the post-checkout job, not storefront option collection.

Public App Store screenshot: bulk packing slips from the same operational workspace.
Setup detail: getting started, stop missing ship dates, ship-by deadlines, custom order columns. Trial Orderline against your morning checklist—not against a feature brochure.
Questions newer merchants ask
Do I need an app at all?
You always need a way to capture options (theme properties or an options app) if customers personalize online. Tags and draft orders are native. A printer app is optional if native packing slips already show properties. A production-queue app is optional until open-every-order fails.
Will teaching Order Printer Pro or Infinite Options hurt Orderline?
No—if you are clear. Those tools do intake and paper/PDF. Orderline does live production visibility. Many shops use an options app and Orderline together; that is the intended stack.
Where do engraving details show after checkout?
On the line’s properties in Shopify order detail—and on packing slips only if the template prints them.
Phone or email custom orders?
Draft order path above; same morning loop after payment.
What to do this week
Write the capture rule. Install or fix one options app and prove properties on a test order. Create one offline draft with a personalization note. Standardize three tags and optionally a Flow to auto-tag custom. Print one packing slip that shows line item properties (Order Printer Pro or native template). Run the morning filter on Unfulfilled custom work. If that still costs more time than it saves, trial Orderline while keeping your options app for the product page.
Forums are right about draft orders, tags, and packing slips. They become a real system only when personalization is captured on the line, printed for the floor, and—when volume demands it—visible in one production queue instead of a scavenger hunt through Admin.